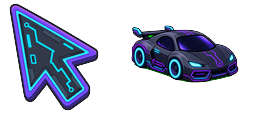

커서 미리보기: Bugatti Chiron - 1 - cute-cursor.com

커서 팩

Bugatti Chiron

Supercars328회 추가됨

Browse with Bugatti Chiron - a Chrome cursor featuring automotive brand pointer and speed hover. Car enthusiast fan art.

확장 프로그램에 추가

Spruce up your browsing experience with the sleek and stylish Bugatti Chiron cursor from the Supercars Cursor Collection. This high-performance supercar is sure to turn heads as you navigate through your favorite websites. With a top speed of over 300mph and a 1,500 horsepower engine, the Bugatti Chiron is one of the most coveted vehicles in the world. Now, you can bring a piece of that luxury to your computer with this elegant cursor. Download it today and make your browsing experience that much more luxurious.

커서 파일

파일을 다운로드하거나 정확한 핫스팟이 적용된 CSS, JavaScript, React, Roblox 코드를 바로 복사해 사용하세요.

커서 - 1 - cute-cursor.com

커서

파일을 다운로드하거나 웹사이트, React, JavaScript, Roblox용 임베드 코드를 복사하세요.

이 CSS를 스타일시트에 붙여넣으세요. 핫스팟 좌표가 이미 포함되어 있습니다.

.custom-cursor {
  cursor: url('https://cute-cursor.com/cdn/packs/10452/arrow.png') 8 6, auto;
}

이 JavaScript를 붙여넣으면 정확한 핫스팟으로 커서가 적용됩니다.

const CURSOR_URL = 'https://cute-cursor.com/cdn/packs/10452/arrow.png';
const HOTSPOT_X = 8;
const HOTSPOT_Y = 6;
const CURSOR_FALLBACK = 'auto';

const cursorValue = `url('${CURSOR_URL}') ${HOTSPOT_X} ${HOTSPOT_Y}, ${CURSOR_FALLBACK}`;

// Apply to the whole page
document.body.style.cursor = cursorValue;

// Or apply to a specific element
// const target = document.querySelector('.my-element');
// if (target) target.style.cursor = cursorValue;

이 React 컴포넌트를 복사해 콘텐츠를 감싸주세요.

import React from 'react';

const CURSOR_URL = 'https://cute-cursor.com/cdn/packs/10452/arrow.png';
const HOTSPOT_X = 8;
const HOTSPOT_Y = 6;
const CURSOR_FALLBACK = 'auto';

export default function CustomCursor({ children, className = '', as: Tag = 'div', style = {}, ...props }) {
  const cursorStyle = {
    cursor: `url('${CURSOR_URL}') ${HOTSPOT_X} ${HOTSPOT_Y}, ${CURSOR_FALLBACK}`,
    ...style,
  };

  return (
    <Tag className={className} style={cursorStyle} {...props}>
      {children}
    </Tag>
  );
}

// Usage:
// <CustomCursor>Your content</CustomCursor>

이미지를 Roblox에 업로드하고 YOUR_ASSET_ID를 교체한 다음, 이 LocalScript를 붙여넣으세요.

-- Roblox custom cursor
-- Image URL: https://cute-cursor.com/cdn/packs/10452/arrow.png
-- Hotspot: 8, 6
-- Size: 128x128
-- 1. Upload the image to Roblox and copy rbxassetid
-- 2. Replace YOUR_ASSET_ID below
-- 3. Put this LocalScript in StarterPlayer > StarterPlayerScripts

local UserInputService = game:GetService("UserInputService")
local RunService = game:GetService("RunService")
local Players = game:GetService("Players")

local player = Players.LocalPlayer
local playerGui = player:WaitForChild("PlayerGui")

local HOTSPOT_X = 8
local HOTSPOT_Y = 6
local CURSOR_WIDTH = 128
local CURSOR_HEIGHT = 128

local screenGui = Instance.new("ScreenGui")
screenGui.Name = "CustomCursorGui"
screenGui.ResetOnSpawn = false
screenGui.IgnoreGuiInset = true
screenGui.DisplayOrder = 999999
screenGui.Parent = playerGui

local cursor = Instance.new("ImageLabel")
cursor.Name = "CustomCursor"
cursor.BackgroundTransparency = 1
cursor.Size = UDim2.fromOffset(CURSOR_WIDTH, CURSOR_HEIGHT)
cursor.Image = "rbxassetid://YOUR_ASSET_ID"
cursor.ZIndex = 999999
cursor.Parent = screenGui

UserInputService.MouseIconEnabled = false

RunService.RenderStepped:Connect(function()
    local mouseLocation = UserInputService:GetMouseLocation()
    cursor.Position = UDim2.fromOffset(mouseLocation.X - HOTSPOT_X, mouseLocation.Y - HOTSPOT_Y)
end)
포인터 - 2 - cute-cursor.com

포인터

파일을 다운로드하거나 웹사이트, React, JavaScript, Roblox용 임베드 코드를 복사하세요.

이 CSS를 스타일시트에 붙여넣으세요. 핫스팟 좌표가 이미 포함되어 있습니다.

.custom-pointer {
  cursor: url('https://cute-cursor.com/cdn/packs/10452/hand.png') 20 4, pointer;
}

이 JavaScript를 붙여넣으면 정확한 핫스팟으로 커서가 적용됩니다.

const CURSOR_URL = 'https://cute-cursor.com/cdn/packs/10452/hand.png';
const HOTSPOT_X = 20;
const HOTSPOT_Y = 4;
const CURSOR_FALLBACK = 'pointer';

const cursorValue = `url('${CURSOR_URL}') ${HOTSPOT_X} ${HOTSPOT_Y}, ${CURSOR_FALLBACK}`;

// Apply to the whole page
document.body.style.cursor = cursorValue;

// Or apply to a specific element
// const target = document.querySelector('.my-element');
// if (target) target.style.cursor = cursorValue;

이 React 컴포넌트를 복사해 콘텐츠를 감싸주세요.

import React from 'react';

const CURSOR_URL = 'https://cute-cursor.com/cdn/packs/10452/hand.png';
const HOTSPOT_X = 20;
const HOTSPOT_Y = 4;
const CURSOR_FALLBACK = 'pointer';

export default function CustomPointer({ children, className = '', as: Tag = 'div', style = {}, ...props }) {
  const cursorStyle = {
    cursor: `url('${CURSOR_URL}') ${HOTSPOT_X} ${HOTSPOT_Y}, ${CURSOR_FALLBACK}`,
    ...style,
  };

  return (
    <Tag className={className} style={cursorStyle} {...props}>
      {children}
    </Tag>
  );
}

// Usage:
// <CustomPointer>Your content</CustomPointer>

이미지를 Roblox에 업로드하고 YOUR_ASSET_ID를 교체한 다음, 이 LocalScript를 붙여넣으세요.

-- Roblox custom cursor
-- Image URL: https://cute-cursor.com/cdn/packs/10452/hand.png
-- Hotspot: 20, 4
-- Size: 128x128
-- 1. Upload the image to Roblox and copy rbxassetid
-- 2. Replace YOUR_ASSET_ID below
-- 3. Put this LocalScript in StarterPlayer > StarterPlayerScripts

local UserInputService = game:GetService("UserInputService")
local RunService = game:GetService("RunService")
local Players = game:GetService("Players")

local player = Players.LocalPlayer
local playerGui = player:WaitForChild("PlayerGui")

local HOTSPOT_X = 20
local HOTSPOT_Y = 4
local CURSOR_WIDTH = 128
local CURSOR_HEIGHT = 128

local screenGui = Instance.new("ScreenGui")
screenGui.Name = "CustomCursorGui"
screenGui.ResetOnSpawn = false
screenGui.IgnoreGuiInset = true
screenGui.DisplayOrder = 999999
screenGui.Parent = playerGui

local cursor = Instance.new("ImageLabel")
cursor.Name = "CustomCursor"
cursor.BackgroundTransparency = 1
cursor.Size = UDim2.fromOffset(CURSOR_WIDTH, CURSOR_HEIGHT)
cursor.Image = "rbxassetid://YOUR_ASSET_ID"
cursor.ZIndex = 999999
cursor.Parent = screenGui

UserInputService.MouseIconEnabled = false

RunService.RenderStepped:Connect(function()
    local mouseLocation = UserInputService:GetMouseLocation()
    cursor.Position = UDim2.fromOffset(mouseLocation.X - HOTSPOT_X, mouseLocation.Y - HOTSPOT_Y)
end)
100% 무료

Cursor Changer 확장 프로그램 받기

크롬용 무료 확장 프로그램입니다. 한 번 설치한 후 원하는 커서에서 추가를 클릭하세요.

크롬에 설치